Tag: Visual edit |
|||
| (13 intermediate revisions by 3 users not shown) | |||
| Line 1: | Line 1: | ||
{{stub}} |
{{stub}} |
||
[[File:Icon_Creatures.png|right]] |
[[File:Icon_Creatures.png|right]] |
||
| ⚫ | |||
| − | The '''Creatures''' in [[Gemea]]. |
||
| − | == |
+ | ==Farming== |
| + | You can befriend and adopt any of these animals. |
||
| ⚫ | |||
| + | To house animals on your [[Farming#Farm Locations|farm]] you need to build and place farming structures for them first. {{Icon Link|image=LargeAnimalPenIcon.png|link=Large Animal Pen}}s and {{Icon Link|image=SmallAnimalPenIcon.png|link=Small Animal Pen}}s (or {{Icon Link|image=SturdyLargeAnimalPenIcon.png|link=Sturdy Large Animal Pen}}s and {{Icon Link|image=SturdySmallAnimalPenIcon.png|link=Sturdy Small Animal Pen}}s) are necessary to adopt animals. They house one large or one small animal respectively. |
||
| − | Through your adventures you can befriend and adopt these critters. Although, to lure them to your [[farm]] and adopt them requires feeding them their favourite food. |
||
| + | After placing the appropriate structure interact with the animal while having their favorite food in inventory. You can now feed the animal until it follows you, then walk it back to your farm (feeding it more if necessary) and adopt it. |
||
| − | Without having their favourite food in your inventory many of the animals will turn away or run away from you. |
||
| + | Animals housed on the farm produce resources over time. Their produce is placed in the big red chest at the farm for you to pick up. Each creature produces a different product. |
||
| − | All creatures once befriend and given home on a farm will produce products that can be used for crafting. |
||
| + | Animals can be released by interacting with the menu for the pen they are currently in, freeing it for the new animal. |
||
| − | Each creature produces a different product aiding in your stock of material. |
||
| − | == |
+ | ===Animal Care Rating=== |
| + | {{Icon Link|image=FodderTroughIcon.png|link=Fodder Trough}}s and {{Icon Link|image=WaterTroughIcon.png|link=Water Trough}}s keep the animals happy on the farm. You need to place one of each per one large or two small animals to keep maximum [[Farming#Increasing the Rating|Animal Care rating]]. |
||
| − | <div style="width:75%"> |
||
| − | <center> |
||
| − | <big>Foxes</big>{{FP icon|GrassFoxIcon.png|Grass Fox|size=140px}}{{FP icon|BurrowFoxIcon.png|Burrow Fox|size=136px}}{{FP icon|FrostFoxIcon.png|Frost Fox|size=137px}}{{FP icon|GlossFoxIcon.png|Gloss Fox|size=145px}}{{FP icon|JungleFoxIcon.png|Jungle Fox|size=142px}}{{FP icon|SilkFoxIcon.png|Silk Fox|size=140px}}{{FP icon|SootFoxIcon.png|Soot Fox|size=140px}}<div class="icondiv"></div> |
||
| − | <div class="icondiv"></div> |
||
| − | <div class="icondiv"></div> |
||
| − | <div class="icondiv"></div> |
||
| − | <div class="icondiv"></div> |
||
| − | <div class="icondiv"></div> |
||
| − | <div class="icondiv"></div> |
||
| − | <br /> |
||
| + | You can also interact with an animal to bring this rating up. |
||
| + | ==List of Animals== |
||
| − | |||
| + | There are '''16 species''' of animals in the game. |
||
| − | |||
| + | {| class="wikitable sortable" |
||
| − | <div class="icondiv">{{FP icon|GroffleIcon.png|Groffle|size=150px}}</div> |
||
| + | !class="unsortable"|Image |
||
| − | <div class="icondiv">{{FP icon|Bambex.png|Bambex|size=150px}}</div> |
||
| + | !Name |
||
| − | <div class="icondiv">{{FP icon|Squomble.png|Squomble|size=150px}}</div> |
||
| + | !Feed |
||
| − | <div class="icondiv">{{FP icon|Fabbit.png|Fabbit|size=150px}}</div> |
||
| + | !Produce |
||
| − | <div class="icondiv">{{FP icon|FenicornIcon.png|Fenicorn|size=150px}}</div> |
||
| + | !Size |
||
| − | <div class="icondiv">{{FP icon|GirpaccaIcon.png|Girpacca|size=150px}}</div> |
||
| + | !Location |
||
| − | <div class="icondiv">{{FP icon|FluffCubIcon.png|Fluff Cub|size=150px}}</div> |
||
| + | !Season |
||
| − | <br /> |
||
| + | |- |
||
| − | |||
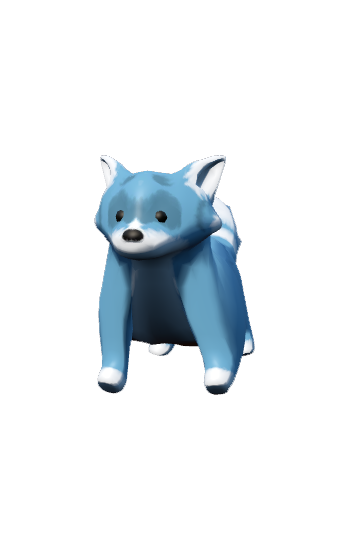
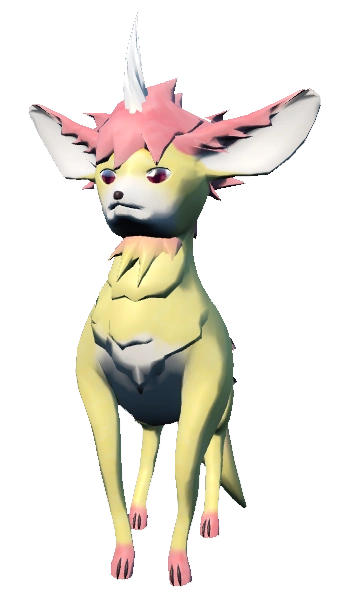
| + | |[[File:GrassFoxIcon.png|64px]] |
||
| − | |||
| + | |[[Grass Fox]] |
||
| − | <div class="icondiv">{{FP icon|SprigpigIcon.png|Sprig-pig|size=150px}}</div> |
||
| + | |{{Icon Link|image=FodderIcon.png|link=Fodder}} |
||
| − | <div class="icondiv">{{FP icon|KirinIcon.png|Kirin|size=150px}}</div> |
||
| + | |{{Icon Link|image=ClayIcon.png|link=Clay}} |
||
| + | |Small |
||
| + | |[[The Grasslands]] |
||
| + | |Spring • Summer • Fall |
||
| + | |- |
||
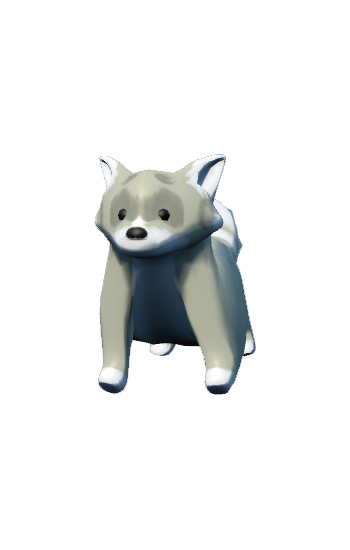
| + | |[[File:BurrowFoxIcon.png|64px]] |
||
| + | |[[Burrow Fox]] |
||
| + | |{{Icon Link|image=FodderIcon.png|link=Fodder}} |
||
| + | |{{Icon Link|image=StoneIcon.png|link=Stone}} |
||
| + | |Small |
||
| + | |[[Sunderwind Wilds]] |
||
| + | |All |
||
| + | |- |
||
| + | |[[File:FrostFoxIcon.png|64px]] |
||
| + | |[[Frost Fox]] |
||
| + | |{{Icon Link|image=FodderIcon.png|link=Fodder}} |
||
| + | |{{Icon Link|image=WaterIcon.png|link=Water}} |
||
| + | |Small |
||
| + | |[[The Shivering Plains]] |
||
| + | |Fall • Winter • Spring |
||
| + | |- |
||
| + | |[[File:GlossFoxIcon.png|64px]] |
||
| + | |[[Gloss Fox]] |
||
| + | |{{Icon Link|image=FodderIcon.png|link=Fodder}} |
||
| + | |{{Icon Link|image=OilIcon.png|link=Oil}} |
||
| + | |Small |
||
| + | |[[Crestfall Coast]] |
||
| + | |Spring • Summer • Fall |
||
| + | |- |
||
| + | |[[File:JungleFoxIcon.png|64px]] |
||
| + | |[[Jungle Fox]] |
||
| + | |{{Icon Link|image=FodderIcon.png|link=Fodder}} |
||
| + | |{{Icon Link|image=VineIcon.png|link=Vine}} |
||
| + | |Small |
||
| + | |[[Dapplewood Forest]] |
||
| + | |All |
||
| + | |- |
||
| + | |[[File:SilkFoxIcon.png|64px]] |
||
| + | |[[Silk Fox]] |
||
| + | |{{Icon Link|image=FodderIcon.png|link=Fodder}} |
||
| + | |{{Icon Link|image=SilkIcon.png|link=Silk}} |
||
| + | |Small |
||
| + | |[[Hearthwind Vale]] |
||
| + | |Fall • Winter • Spring |
||
| + | |- |
||
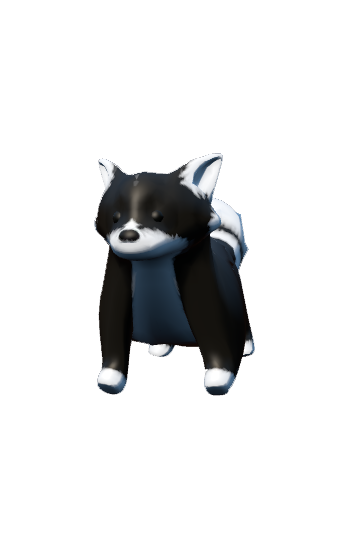
| + | |[[File:SootFoxIcon.png|64px]] |
||
| + | |[[Soot Fox]] |
||
| + | |{{Icon Link|image=FodderIcon.png|link=Fodder}} |
||
| + | |{{Icon Link|image=CoalIcon.png|link=Coal}} |
||
| + | |Small |
||
| + | |[[Numino Peak]] |
||
| + | |Spring • Summer • Fall |
||
| + | |- |
||
| + | |[[File:Groffle.png|64px]] |
||
| + | |[[Groffle]] |
||
| + | |{{Icon Link|image=CeliumSeedIcon.png|link=Celium Seed}} |
||
| + | |{{Icon Link|image=GroffleMilkIcon.png|link=Groffle Milk}} |
||
| + | |Large |
||
| + | |[[The Grasslands]] |
||
| + | |Spring • Summer • Winter |
||
| + | |- |
||
| + | |[[File:Bambex.png|64px]] |
||
| + | |[[Bambex]] |
||
| + | |{{Icon Link|image=VineIcon.png|link=Vine}} |
||
| + | |{{Icon Link|image=PeltIcon.png|link=Pelt}} |
||
| + | |Small |
||
| + | |[[Dapplewood Forest]] |
||
| + | |Spring • Fall • Winter |
||
| + | |- |
||
| + | |[[File:Squomble.png|64px]] |
||
| + | |[[Squomble]] |
||
| + | |{{Icon Link|image=WoodIcon.png|link=Wood}} |
||
| + | |{{Icon Link|image=StickIcon.png|link=Stick}} |
||
| + | |Small |
||
| + | |[[Sunderwind Wilds]] |
||
| + | |All |
||
| + | |- |
||
| + | |[[File:Fabbit.png|64px]] |
||
| + | |[[Fabbit]] |
||
| + | |{{Icon Link|image=HerbsIcon.png|link=Herbs}} |
||
| + | |{{Icon Link|image=EggIcon.png|link=Egg}} |
||
| + | |Small |
||
| + | |[[Hearthwind Vale]] |
||
| + | |All |
||
| + | |- |
||
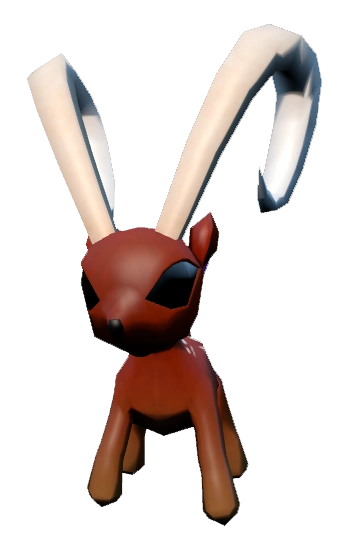
| + | |[[File:Fenicorn.png|64px]] |
||
| + | |[[Fenicorn]] |
||
| + | |{{Icon Link|image=PoutineIcon.png|link=Poutine}} |
||
| + | |{{Icon Link|image=HideIcon.png|link=Hide}} |
||
| + | |Large |
||
| + | |[[Radiant Sands]] |
||
| + | |Spring • Summer • Fall |
||
| + | |- |
||
| + | |[[File:Girpacca.png|64px]] |
||
| + | |[[Girpacca]] |
||
| + | |{{Icon Link|image=WarmMilkIcon.png|link=Warm Milk}} |
||
| + | |{{Icon Link|image=FluffIcon.png|link=Fluff}} |
||
| + | |Large |
||
| + | |[[Numino Peak]] |
||
| + | |Spring • Fall • Winter |
||
| + | |- |
||
| + | |[[File:FluffCub.png|64px]] |
||
| + | |[[Fluff Cub]] |
||
| + | |{{Icon Link|image=CookedFishIcon.png|link=Cooked Fish}} |
||
| + | |{{Icon Link|image=FluffIcon.png|link=Fluff}} |
||
| + | |Large |
||
| + | |[[The Shivering Plains]] |
||
| + | |Spring • Fall • Winter |
||
| + | |- |
||
| + | |[[File:SprigPig.png|64px]] |
||
| + | |[[Sprig-pig]] |
||
| + | |{{Icon Link|image=MushroomIcon.png|link=Mushroom}} |
||
| + | |[[:Category:Flowers|Flowers]]: {{Icon Link|image=AyvaFlowerIcon.png|link=Ayva Flower|hide=1}} {{Icon Link|image=ButtaberryFlowerIcon.png|link=Buttaberry Flower|hide=1}} {{Icon Link|image=CeliumFlowerIcon.png|link=Celium Flower|hide=1}} {{Icon Link|image=LyabudFlowerIcon.png|link=Lyabud Flower|hide=1}} {{Icon Link|image=MoonsilkFlowerIcon.png|link=Moonsilk Flower|hide=1}} |
||
| + | |Small |
||
| + | |[[Crestfall Coast]] |
||
| + | |Spring • Fall • Winter |
||
| + | |- |
||
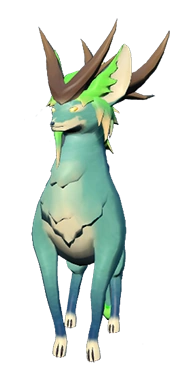
| + | |[[File:Kirin.png|64px]] |
||
| + | |[[Kirin]] |
||
| + | |{{Icon Link|image=LuckyRainbowFishIcon.png|link=Lucky Rainbow Fish}} |
||
| + | |Dye: {{Icon Link|image=BlackDyeIcon.png|link=Black Dye|hide=1}} {{Icon Link|image=BlueDyeIcon.png|link=Blue Dye|hide=1}} {{Icon Link|image=BrownDyeIcon.png|link=Brown Dye|hide=1}} {{Icon Link|image=GreenDyeIcon.png|link=Green Dye|hide=1}} {{Icon Link|image=OrangeDyeIcon.png|link=Orange Dye|hide=1}} <br/>{{Icon Link|image=PinkDyeIcon.png|link=Pink Dye|hide=1}} {{Icon Link|image=PurpleDyeIcon.png|link=Purple Dye|hide=1}} {{Icon Link|image=RedDyeIcon.png|link=Red Dye|hide=1}} {{Icon Link|image=WhiteDyeIcon.png|link=White Dye|hide=1}} {{Icon Link|image=YellowDyeIcon.png|link=Yellow Dye|hide=1}} |
||
| + | |Large |
||
| + | |Any |
||
| + | |Any |
||
| + | |} |
||
==Notes== |
==Notes== |
||
* [[Kari]] loves to share her knowledge about animals. She travels through [[Gemea]]. |
* [[Kari]] loves to share her knowledge about animals. She travels through [[Gemea]]. |
||
| − | * |
+ | *Adopting your first [[animal]] unlocks ''BFF'' [[Achievements|steam achievement]]. |
| + | *Adopting every animal type in the game unlocks ''Critter Crazy'' [[Achievements|steam achievement]]. |
||
| − | * After adopting all kinds of '''Animals''' an [[Achievements|Archievement]] is unlocked: "'''Critter Crazy'''". |
||
| + | ::''Note that you don't need to adopt [[Kirin]] to get this achievement. |
||
| − | |||
| − | ==Trivia== |
||
[[Category:Creatures| ]] |
[[Category:Creatures| ]] |
||
| + | [[Category:Farming]] |
||
| + | [[Category:Achievements]] |
||
Revision as of 07:54, 14 May 2018
| This article is a stub. You can help Yonder: The Cloud Catcher Chronicles Wiki by expanding it. |
Scattered throughout the island of Gemea are wondrous and delightful creatures.
Farming
You can befriend and adopt any of these animals.
To house animals on your farm you need to build and place farming structures for them first. ![]() Large Animal Pens and
Large Animal Pens and ![]() Small Animal Pens (or
Small Animal Pens (or ![]() Sturdy Large Animal Pens and
Sturdy Large Animal Pens and ![]() Sturdy Small Animal Pens) are necessary to adopt animals. They house one large or one small animal respectively.
Sturdy Small Animal Pens) are necessary to adopt animals. They house one large or one small animal respectively.
After placing the appropriate structure interact with the animal while having their favorite food in inventory. You can now feed the animal until it follows you, then walk it back to your farm (feeding it more if necessary) and adopt it.
Animals housed on the farm produce resources over time. Their produce is placed in the big red chest at the farm for you to pick up. Each creature produces a different product.
Animals can be released by interacting with the menu for the pen they are currently in, freeing it for the new animal.
Animal Care Rating
![]() Fodder Troughs and
Fodder Troughs and ![]() Water Troughs keep the animals happy on the farm. You need to place one of each per one large or two small animals to keep maximum Animal Care rating.
Water Troughs keep the animals happy on the farm. You need to place one of each per one large or two small animals to keep maximum Animal Care rating.
You can also interact with an animal to bring this rating up.
List of Animals
There are 16 species of animals in the game.


Notes
- Kari loves to share her knowledge about animals. She travels through Gemea.
- Adopting your first animal unlocks BFF steam achievement.
- Adopting every animal type in the game unlocks Critter Crazy steam achievement.
- Note that you don't need to adopt Kirin to get this achievement.